After a long winter, your warm-season turf (Couch, Kikuyu, Buffalo, Zoysia) is ready for its growth spurt. A full spring renovation is the single most effective way to eliminate thatch, relieve soil compaction, and set your lawn up for a thick, vibrant summer.
This in-depth guide is based on turf science and is designed specifically for the aggressive growth and quick recovery required in Australian conditions. Follow this sequence using Garden Nursery Products (GNP) to achieve the healthiest, greenest lawn on your street.
TL;DR: Quick Renovation Checklist
Too busy to read the whole masterclass? Here are the eight crucial steps you must follow for a successful spring turf renovation:
- Timing: Wait for soil temperature to be above 18 Degrees (Late September/October).
- Weed Kill & Pre-Boost: Apply selective herbicide Dicamba M and ECO 88s Fertiliser, 7-10 days before the main work.
- Scalp & Dethatch: Cut low (scalping) and remove the spongy thatch layer.
- Aerate: Punch holes (core aerate is best) to relieve compaction.
- Post-Fertilise: Apply slow-release granular feed and liquid wetting agent Plant of Health Lawn & Turf.
- Top Dress: Spread a thin layer of sand/loam mix, ensuring grass tips are visible.
- Water: Water shallow and frequent for the first 3 weeks until new growth is established.
- Mow: Wait for new growth to reach 5-6 cm (or mow early with a cylinder mower).
1. Critical Timing and Initial Assessment (The Foundation)
The Scientific Window: 18 Degrees Soil Temperature
The number one mistake is renovating too early. An aggressive renovation stresses the grass, and it needs high biological activity for rapid recovery.
- When to Start: Wait until your soil temperature is consistently above 18 Degrees at a depth of 5cm. This typically occurs from late September into October in warmer regions, and later in cooler Southern areas. Use a soil thermometer for accuracy—don’t just rely on air temperature.
- Initial Prep: Before you do anything else, thoroughly rake up all debris, leaves, and rocks. Your mower blades will be running low, and any hidden object can cause serious damage.
Grass-Specific Preparation: Know Your Limits
| Grass Type | Key Runner Type | Renovation Aggression | Biological Reason |
|---|---|---|---|
| Couch/Kikuyu | Stolons (surface) & Rhizomes (underground). | Maximum Aggression (Scalping to soil level) | They can regenerate entirely from deep underground rhizomes, making them highly resilient to aggressive scarification. |
| Buffalo (e.g., Sir Walter) | Stolons (surface) only. | Shallow Dethatching (Mow low, but DON’T scalp to the dirt) | It lacks rhizomes, meaning you must leave some stolon and green leaf tissue intact to regenerate from the surface. |
| Zoysia (e.g., Sir Grange) | Stolons (surface) & Rhizomes (underground). | Deep, but Moderate Aggression | It can handle heavy work but is a naturally slower grower than Couch/Kikuyu, so recovery may take longer. |
2. Advanced Renovation Prep: Weed Kill and Fertilisation

This section ensures the lawn is nutritionally and chemically ready to handle the stress of scalping and dethatching.
2a. Post-Emergent Kill (Targeting Existing Weeds)
- Remove Existing Broadleaf Weeds: Apply a selective broadleaf herbicide 7-10 days before your renovation begins.
- Ensure Safety: Always check the product label to confirm it is safe for your specific warm-season turf type (especially Buffalo).
- Application Rate: For high-efficacy products: 5mL of product per 1L of water.
GNP Product Focus: Purchase your selective herbicide here: SureFire DICAMBA M Herbicide 1L
2b. Pre-Renovation Nutrient Boost
Applying a fast-release fertiliser right before the renovation is a professional technique to provide maximum nutritional reserves for rapid healing.
- Apply a Quick-Release Fertiliser: Apply a granular fertiliser that is not slow-release, with a high concentration of Nitrogen (N) and micronutrients. The goal is to get nutrients into the plant before the aggressive cut.
- Product Type: ECO 88s is an ideal high-N, quick-release formula that promotes vigorous growth and deep colour.
- Water-In Lightly: Apply a light watering (2-3 mm) immediately to dissolve the granules and move the fast-acting nutrients into the root zone.
GNP Product Focus: Purchase your quick-release fertiliser here: ECO 88s Lawn & Garden Fertiliser 16KG
2c. Pre-Emergent Warning (The Critical Safety Detail)
Pre-emergent herbicides prevent weed seeds from germinating. However, the most common active ingredient, Prodiamine, works by chemically interfering with cell division at the growing tips of new roots.
| Herbicide Family | Active Ingredient | Effect on Renovation | GNP Recommendation |
|---|---|---|---|
| Dinitroanilines | Prodiamine (e.g., Barricade) | DANGEROUS FOR RENOVATION: Will significantly inhibit the new, shallow-rooted runners (stolons/rhizomes) your turf needs for quick repair. This stops the renovation from healing. | DO NOT USE for renovation recovery. (Use Barricade Pre-Emergent Herbicide for established turf only). |
Action: Given the high risk to new root growth from common products, AVOID using pre-emergent herbicides for the first 6 weeks post-renovation. Rely on the post-emergent kill (Step 2a) and monitor closely.
3. Scalping and Dethatching (Thatch Removal)

Thatch is the spongy layer of dead and living organic matter between the green blades and the soil. It prevents water, air, and nutrients from reaching the root zone.
- The Scalp: Gradually lower your mower over 2-3 passes. On the final pass, scalp the lawn down to your maximum safe depth (refer to the table in Section 1).
- Scientific Reason: This massive leaf removal triggers a natural biological response in the turf, prompting it to aggressively send out new shoots and runners for survival.
- Dethatch/Scarify (Removing the Mat): Use a machine with scarifying blades (for Couch/Kikuyu) or spring tines (for Buffalo/Zoysia) to physically comb out the dense, dead material.
- Clean Up: Rake up and remove all of the dead debris. Leaving this heavy thatch mat will smother new growth, promote fungal diseases, and negate the entire step.
4. Aeration (Relieving Soil Compaction)
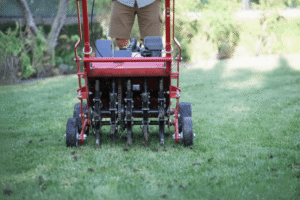
Compacted soil starves roots of oxygen, restricts water infiltration, and makes it impossible for roots to grow deep—all critical factors after renovation stress.
- Method: Use a Core Aerator (the gold standard) to pull out soil plugs, creating vertical channels into the sub-soil. This is superior to spike aeration (which just pushes the soil aside).
- Scientific Benefit: These new channels allow oxygen—vital for root respiration—and water to penetrate deep, facilitating massive root growth below the surface where temperatures are cooler and more stable.
- Post-Aeration: Leave the soil plugs on the surface. They contain beneficial microbes and organic matter and will dissolve back into the turf over a few weeks.
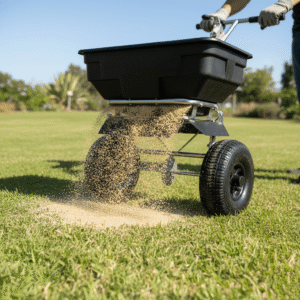
5. Post-Renovation Fertilise and Condition

With the soil now open, you have a 48-hour window to deliver maximum nutrition for aggressive recovery and long-term health.
- Fertilisation: Apply a high-Nitrogen (N) slow-release granular fertiliser at the label rate. This provides sustained feeding over the critical 8-12 week recovery period.
- Micronutrient Power: Simultaneously apply a granular product high in Iron (Fe). Iron is essential for chlorophyll production and will accelerate the return of that deep, dark green colour fast.
- Soil Conditioners:
- Wetting Agent: Apply a high-quality soil wetter. This is mandatory, as it breaks the water-repellent surface tension (hydrophobicity) and ensures water moves down the aeration channels.
- Humatics & Seaweed: Apply a liquid soil conditioner (like a SeaSol equivalent) rich in humic acids and kelp extracts. These bio-stimulants enhance root cell division and drastically reduce the shock and stress caused by the aggressive renovation steps.
- Water-In: IMMEDIATELY and THOROUGHLY water the lawn with 5-10mm of irrigation to dissolve the granular products and move the liquid agents into the active root zone.
GNP Product Focus: Purchase your essentials here:
- Slow Release Fertiliser: ORGANIC LINK Slow Release Fertiliser 25kg
- Wetting Agent: PCT Reactor WETTER 600 5L
- Seaweed/Humatics:SEASOL COMMERCIAL Liquid Seaweed Concentrate
6. Top Dressing and Levelling
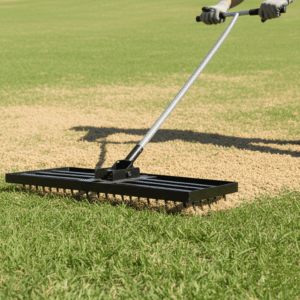
Top dressing fills the aeration holes, protects the exposed runners from drying out, and improves the soil structure.
- Material: Use a clean, screened Washed River Sand for levelling, or an 80/20 Sandy Loam Mix to introduce organic matter to sandier soils.
- Application Technique: Use a Leveling Lute (the professional tool) or the back of a steel rake to drag the mixture evenly.
- The Golden Rule: Never apply more than 10mm (1cm) of top dress in a single application. The tips of the green grass blades MUST be visible to allow for photosynthesis. If the mix is too thick, you will smother the turf and invite fungal disease.
7. The Recovery Watering Schedule

The 4-6 weeks after renovation require a specialized, vigilant watering strategy focused on shallow, frequent moisture until the new roots are established.
| Phase | Goal | Frequency & Duration | Biological Reason |
|---|---|---|---|
| Recovery (First 2-3 Weeks) | Keep the top 2-3cm of soil moist. | Shallow and Frequent: 2-4 times per day for short bursts (5-10 minutes). | The exposed runners are extremely vulnerable to drying out. Frequent, light watering keeps the shallow root tips alive. |
| Establishment (Weeks 3-6) | Encourage roots to grow deeper. | Deeper and Less Frequent: Transition to once per day, then every second day, soaking the soil deeper (15-20 minutes). | You are training the rapidly forming new roots to chase moisture deeper into the cool, stable soil profile. |
8. Post-Renovation Maintenance (The Recovery Window)
8a. When and How to Mow (The First Cut)
The goal of the first mow is to remove the newly grown tips and promote lateral (sideways) growth.
| Mower Type | Timing & Height | Scientific Reason |
|---|---|---|
| Rotary (Standard Homeowner) | Wait until the grass has recovered about 70-80% and new leaf growth reaches 5-6cm high (3-4 weeks). | The rotary blade’s action can displace the topdressing and stress vulnerable runners. Waiting reduces this risk. |
| Cylinder (Expert/High-End) | You can mow much earlier—as soon as the new green growth is visible (often 7–10 days post-renovation). | The clean shearing cut and roller cause less trauma to the leaf and helps settle the topdressing, promoting faster lateral growth. |
- First Cut Height: For both mower types, set your mower to a high setting (at least 4cm for the first few cuts. Do not scalp the lawn again.
8b. Liquid Feeding & Pest Management
- Liquid Feed: Around 3 weeks after renovation, apply a liquid feed high in Nitrogen for an instant, foliar boost such as Seasol Powerfeed.
- Grub Prevention: The lawn is vulnerable post-stress. Consider applying a long-lasting granular grub killer, such as ACELEPRYN 10kg Granules Insecticide, to provide season-long protection.
- Fungicide: Treat any fungal patches (like Dollar Spot) immediately with a broad-spectrum fungicide.
Frequently Asked Questions (FAQ)
Q: How long does it take for the lawn to recover after renovation?
A: With good spring weather and proper watering, you should see noticeable green recovery and lateral spreading within 3 to 4 weeks. The lawn will be fully dense and ready for regular maintenance within 6 to 8 weeks.
Q: What is the biggest mistake people make during renovation?
A: Using a standard Prodiamine-based pre-emergent herbicide (like Barricade) immediately after renovation. It inhibits the new root growth the grass needs to repair itself, leading to very slow or failed recovery. We strongly recommend avoiding all pre-emergents for the first 6 weeks post-renovation to guarantee recovery.
Q: Do I need to top dress every time I renovate?
A: No. Top dressing is primarily for levelling and filling aeration holes. If your lawn is perfectly flat and you are only doing a light dethatching, you can skip this step. For severe thatch or bumps, it is essential.
Q: Why does my lawn look brown and dead after scalping?
A: This is completely normal and is temporary. You have removed the green leaf tissue, exposing the brown stems and runners. The plant’s energy is now focused on sending out new green shoots from those runners, which will result in a much thicker lawn than before.
SHOP NOW at Garden Nursery Products and get all your renovation essentials delivered directly to your door to start your spring transformation!